Headshock Super Fatty - first attempt on service

jakub_a

Member
After many years or riding without rebound damping I finally was able to remove the piston and the shim. I measured some of the seals:
- U-cup seals are SAE and are for a 0.5in (or 1/2in) shaft (inner diameter). Height is 0.125in (or 1/8in)
- Two cup and bottom cup outer o-rings are metric and are 21x2mm (inner diameter x cross section)
- Air piston seals (2) are 18x2.5mm


If anyone has factory dimensions and mine are off, please correct me.
 
Last edited:

jakub_a

Member
The universe was kind to me today. I was very lucky to find a used damper locally. Someone sourced some old cannondale headshok parts from a bike shop in Switzerland among which were two of these DD80:dampers. Got one and put it in. It needs new seals but otherwise it’s in great shape.

add link html

Now I need will try to import those SAE seals from the US. Than you for being so kind and listing them here.
 
Last edited:

JaimeCO303

New Member
Nice! I have same kind on my super v sl 2000
 

Attachments

  • Screenshot_20220202-164540~3.png
    Screenshot_20220202-164540~3.png
    668.4 KB · Views: 149

MikeA

Well-Known Member
Nice! I have same kind on my super v sl 2000

Jaime, that's not the same fork, yours is actually a better fork! It looks like you have a '99 Super Fatty SL. If it still has the original damper, the SL has a 5 position dial on the top to adjust low speed damping on the fly. At the time, Cannondale sold shim kits where dealers could also adjust high speed damping. This fork was on top of the line bikes.
 
Hi everyone, I am in the process of servicing a couple of Headshocks. Working on the Super model first - this is off a 2001 Jekyll and the guide from Victor at the beginning of this thread has been super useful. However, I have a couple of queries for things I can't work out at the moment regarding the oil damper. I'm using the Service Kit KF236. and I've attached a few photos so its clearer, hopefully, what I'm talking about.

1) The kit has 2 Blue seals of the type inside the two cups (#1 in the photo). I understand that one is enough and I've been advised to replace the inner seal on each cup, leaving the old one in the outer positions. However I can't work out how to separate the shaft to get at the top cap, and the lockout bits. How do I separate the shaft on this model? Do I actually need to? I have read that the top cap seals wear less. I'm not sure of the lockout is working though.
L1050131.jpg


2) In the KF236 kit there is one brown seal which I understand replaces the old black one at #8. There are two black ones the same size which I believe replace #3 and #5. #6 and #7 are bumpers, not seals, and are ok so no need to replace. However there don't seem to be seals in the kit for #4 and #2. There are a couple of ones in the kit with a bigger x-section which I understand are for a different air piston. So what should I use for #4 and #2? They both seem pretty crucial.
L1050126.jpg
L1050130.jpg


3) There are various other o-rings 2-5mm in diameter in the kit. I haven't found a need for these. Is this right?

Many thanks
George
 
Last edited:

MikeA

Well-Known Member
George, the problem is that you have the wrong kit. You need kit# HD166 for that damper. The KF236 is for the 2005 and up metric threaded dampers.
 
I understand that is the only seal kit available at the moment so it is a matter of making do and finding workarounds. Certainly I haven't been able to find the HD166 in stock anywhere closer than Salt Lake City (eBay) and Australia (Cycleclinic)! Just to clarify, I have found the correct air piston seals separately so it is just the other ones I need. I might need to order from abroad but grateful for any other suggestions for supply in UK or EU. Or, could I order equivalent from an o-ring supplier?

For the top cup and lockout mechanism - unless there are signs of wear or malfunction is it ok to leave alone? The procedure described here
https://forums.mtbr.com/shocks-suspension/headshok-experts-please-help-1135997.html is do-able for me but tricky. (I think it is the right approach for my forks).

Thanks again. Really appreciate the advice.

Hi

Unfortunately I don't know the correct measures for the seals in the HD166 kit, but it's good that you have managed to find the correct seals for the air piston. The brown seal is for the oil piston according to Mike's comment in this thread, and I believe it's a special rubber compound and therefore may be harder to find elsewhere (?) And the seal for the outside of the oil cartridge is not included in the HD166 kit from what I have heard, but what I did was to find the biggest seal in the kit and just expand it so that I could get it around the cartridge. This is maybe not an ideal solution but it works fine and there's been no issues so far...

By the way I have some extra U-cup seals that I will not need so I can ship a couple of them to you if you want , so that you can replace the inner seals in the lower cap on the oil cartridge. (I never replaced the inner seals in the upper cap and it's still working fine) Just pm me with your address.

Best regards
Victor
 
Last edited:
Victor, Mike,
Thanks very much. That's clear now.
I haven't taken the piston assembly apart to get access to the top cup and it doesn't sound as if I really need to, so I'll replace the outer lower cup seal with a blue one and keep the other as spare.
I'll use the larger o-ring in place of #8 as you suggest Victor.

The only question I have left is whether I need to replace seal #2 on the outside of the lower cap? Not sure what function it actually has...
regards
George
 
Update: forks now back in the (replacement) frame, oiled up and pressurised. All good so far but still getting the transmission sorted so haven't actually ridden it to proof test it. But very optimistic.

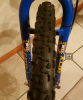
I have turned my attention to the other bike & forks - F600 with Ultra forks from about 2001. Same mechanism as the forks on the Jekyll. However they have had a harder life and I need some expert advice about whether the forks are fixable! The lockout lever just rotates through 360 degrees rather than the normal ~90 degrees and the large hex nut stands about 1mm proud of the top cap.

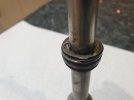
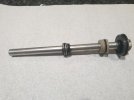
Now I have dismantled the shock, I can see that the lockout mechanism is not working and the washer below the damper piston appears loose and is not clamped up tight to the piston. So it seems to have lost any pre-load. I think someone has forced the lockout lever and it has distorted the lockout mechanism washers beside the piston.

Should I try and separate the parts and reassemble as described in earlier posts in this thread to get it to work properly, or do the symptoms sound terminal:(? I don't actually need the lockout to work - quite happy to have it off 100% of the time. The problem I have is that I can't actually work out how to dissemble the two ends of the damper shaft from each other. I have removed the (bleed?) screw from inside the bottom of the shaft but the instructions at post #14 (MTBR forum) don't seem to be quite right for these forks.

I can attach some photos if that would help. Many thanks.
 

MikeA

Well-Known Member
The hex backing off is the reason you lost lockout and the shaft spins 360, but you can't simply press it back into place. The lockout shims are keyed to the lower shaft, and they and the piston have to be properly located before pressing the hex into place. "ultra" just means it has an aluminum steerer tube, so I'm making the assumption you have a DL70, but you can follow the procedure I wrote on MTBR, those era cartridges are mostly assembled the same way. You'll need to inspect the shaft, piston and shims for damage. And yes, obviously, pictures would help.
 
Mike A, thanks for the reply. Pics attached showing some evidence of damage to the lockout shims - hopefully recoverable if I can dismantle it. Otherwise shaft and pistons (air & oil damper) look ok.

What I am stuck on is this step in the MTBR instructions:
"Disassembly:
Sorry to say, you need a press for this, maybe you have access to one. A manual arbor press is best. First, remove the set screw from inside the top of #1. install a long screw in its place (see pic for what I use) press plates go under threaded cap of #2, press on screw to disassemble; #3 is press fit to #1, that's what holds it all together."

Which is the "set screw from inside the top of #1"? The only screws I can see are are the one at the top holding the lockout lever on and the one inside the lower shaft. I've already removed both of those. Is it the lockout lever screw hole that I need to put the longer screw into for the press?
 

Attachments

  • 20220518_202300.jpg
    20220518_202300.jpg
    2.6 MB · Views: 156
  • 20220518_202242.jpg
    20220518_202242.jpg
    3.2 MB · Views: 162

MaxDale

New Member
Hello all! I have a problem with the new blue plastic seals from KF236 kit. I replaced the old black ones on both sides and my 2006 DLR80 cartridge started to leak badly. You can see the oil leaking even if you just manually pump the cartridge. I found new black seal, removed the blue and installed it in the top cap and it did get way better. It is still leaking when riding but certainly way less. I am wondering what could be the problem with supposed to be better blue seals, I am sure I installed them the right way. Any advise?
 
Top