1991 SE1000

petergt4

Well-Known Member
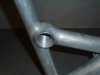
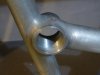
Well, this has been in the making for 27 years... Finally got my hands on an original EST suspension bike, a SE1000, as a frame only.

This project will be over a long period of time, so I don't know when it will be completed, but I already have the majority of components, so it's just a matter of cleaning everything up.

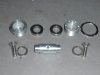
I will make use of my long out-of-service first gen. Girvin Vector fork, which I had originally run on my Killer V 900 (which I now have returned to fully rigid as I kept the Pepperoni fork that came with the bike). This will require most of the project time as I have to adapt a Fox coil-over shock to replace the garbage elastomer shock that was originally installed.

I haven't decided to keep it the original silver color, or go with a custom scheme. I have some ideas, that would be in keeping with the era (although nothing as vivid as the SE2000 neon pink/green/black combo ;) ).

L1050221.JPG L1050222.JPG L1050223.JPG
 

black lightning 1987

Moderator
Staff member
Cool project. That looks like a '91, so first year for full suspension. I'd prefer almost any color over silver. The black/purple '92 paint would look pretty good.
 

petergt4

Well-Known Member
Cool project. That looks like a '91, so first year for full suspension. I'd prefer almost any color over silver. The black/purple '92 paint would look pretty good.

One of my choices would be Red/Purple. I’ve got a red leather Selle Italia Flite saddle and red splash bar tape for a bullhorn bar (by Ergotec, the same like a Scott AT2 or Zoom Brahma). I was thinking red swing arm, red fork legs and purple front triangle. Or, I may do all-red, like a Beast of the East tribute.
 

petergt4

Well-Known Member
I always thought my '93 Beast looks pretty nice in red, but most of the E.S.T. bikes were two colors.

True. That's why I'm playing around with some sketches with different color schemes. Although not a direct rip-off, I'll even consider a similar scheme to the SE OMEGA (maybe Red/Grey, or White/Red instead of the OMEGA White/Grey scheme). Two colors highlight the suspension.

I loved the Beast of the East. Back around '93/'94, there was this bike shop in Albany N.Y. (Downtube Bicycle Works) that was a Cannondale dealer and they had a Beast frameset hanging on the wall... Looked impressive.
 

black lightning 1987

Moderator
Staff member
I think that drawing attention to the suspension may have been the idea behind the two tone paint. Anyone walking into a shop would first notice the paint, then check out the suspension.

I never read the description on the Omega colors before, always thought it was black. I think yellow/red would look great but doesn't fit the era as well as some other combinations.
 

petergt4

Well-Known Member
So, when I bought this frame, it was disclosed that the rear swingarm had a cracked chainstay bridge. Considering that, I decided to check out the front triangle for any other possible cracks and I found one... Just under the downtube at the headtube junction. From what I can tell, it looks like there was a sharp transition of the weld, which caused a stress-riser and then pop, a crack. No help from Cannondale's trademark sanded-down welds, which may have been a thinning of the tube at that area.

I'll fix both. There's debate online of whether an aluminum frame needs to be heat treated or not with a welded repair, so I'm going to have to investigate this further, in person with nerdy, industry types to confirm heat treatment or not. The welding is a non-issue for me. I'll replace the chainstay bridge with a new piece of tube and the downtube crack will be welded, with an overlay patch for reinforcement. No prob...

How I found the crack was using a two-stage penetrating dye that is used for non-destructive crack and leak checking (which I do often in my line of work in the petroleum industry).

L1050224.JPG L1050228.JPG L1050229.JPG L1050231.JPG L1050233.JPG L1050234.JPG L1050236.JPG
 

Isaac.owen

Member
love the dye testing! we use it as well on ship drive shaft and propellers during survey testing.
was there any external signs of a crack developing before the dye test or was the paint covering over it?

thanks
Isaac
 

petergt4

Well-Known Member
love the dye testing! we use it as well on ship drive shaft and propellers during survey testing.
was there any external signs of a crack developing before the dye test or was the paint covering over it?

thanks
Isaac

No signs of it prior to testing. Paint was stripped already, but there was a lot of dirt/grease in that area, so nothing caught my eye.
 

petergt4

Well-Known Member
I checked out the wall thickness of the tubes that will require repair (using an ultrasonic thickness tester that we use at work), as it will guide me in welding machine set-up and what material thickness I'll use for the repair. Readout accuracy will be plus/minus a couple of thousands of an inch as to what is seen on the display screen:

L1050242.JPG L1050243.JPG L1050244.JPG
 

petergt4

Well-Known Member
Are you planning to tig weld the crack?

Yes. Really the only way to fix this. Not only will I weld the crack, but once welded, I'll put an over-lay patch/gusset to reinforce that area. Along the lines of this example (the one on the downtube is exactly what I'd install):

blur-lt-gusset-big.jpg


Simply welding the crack would work in most cases, but with this bike frame, age, work-hardening of the aluminum through use and having cracked once before, it'd be too much to rely on a weld alone.
 

black lightning 1987

Moderator
Staff member
I know the frames were originally heat treated after welding, but it may not be absolutely necessary for a repair. We didn't heat treat much AL on the race cars, but there wasn't much structural stuff made from welded AL.
 

petergt4

Well-Known Member
Not too much work done on this since my last posting. I've drilled out the crack at the headtube. There are multiple holes, because the crack abruptly went in different directions at those locations. In my experience, this helps to alleviate any stress at those points and keeps the cracks from continuing further. The drill size is just a few thou bigger than the thickness of the tube wall (based on the ultrasonic thickness testing I did earlier).

I've also gently reamed out the seat tube to clean up and true the opening, plus spot faced the post clamp bosses to provide a better clamping surface.

Today, I chased-and-faced the BB, plus will look into doing that for the rear swingarm pivot housing as well. It appears to be a right hand BB thread (basically, non-drive side), all the way through. Too narrow though to use my BB tool, as well as having the wrong thread direction on the drive side of the frame (which is interesting, because it looks like Cannondale made these specific parts just for this application. All of these years, I thought it was just a narrow bottom bracket!).

L1050309.JPG L1050310.JPG L1050313.JPG
 

black lightning 1987

Moderator
Staff member
Can't imagine why they would do the BB threading that way. Is the shell 68 mm? Know what BB you want to use? Will have to be something with a right side cup that interchanges with the left. Phil Wood with two left cups would be a good solution.
 

petergt4

Well-Known Member
Can't imagine why they would do the BB threading that way. Is the shell 68 mm? Know what BB you want to use? Will have to be something with a right side cup that interchanges with the left. Phil Wood with two left cups would be a good solution.

No, the BB is a conventional, 68mm wide BSA thread (so RH and LH threading) and I already have one for it. It is the rear suspension pivot shell that is a continuous, right-hand thread all the way through (and is only 45mm wide). It is the same size as a BB thread and my tool does fit in there, but only the non-drive side (which is right hand). This would be just like an Italian BB, as they use RH threading on both sides.

The suspension pivot itself is just like a BB, but uses countersunk screws (inch thread! 3/8"-16!) to hold the swingarm onto the pivot spindle. Bearings are 6903-RK.
 

Attachments

  • L1050318.JPG
    L1050318.JPG
    4.1 MB · Views: 214
  • L1050320.JPG
    L1050320.JPG
    4 MB · Views: 231
  • L1050326.JPG
    L1050326.JPG
    3.4 MB · Views: 228
  • L1050317.JPG
    L1050317.JPG
    4.6 MB · Views: 229
  • L1050324.JPG
    L1050324.JPG
    3.7 MB · Views: 196

black lightning 1987

Moderator
Staff member
Poor reading comprehension on my part.

Perhaps you can do without facing it. Put some layout fluid on the faces and tighten the cups. Should show if the faces are square or not.
 

kurbelwuerger

New Member
Hi !
I am also restoring a SE 1000, can you tell me the dimension of the allen key from the countersunk screws which are fixing
the swingarm. ( i think its not metric, i am from europe so it is a little bit diffcult for me )
 
Top