SM800 restoration project

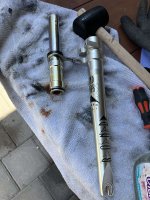
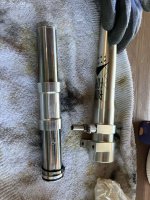
Continued on the fork service, while I wait for various parts/supplies.
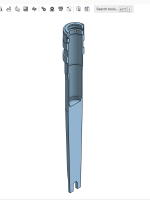
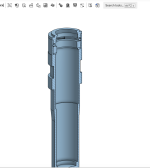
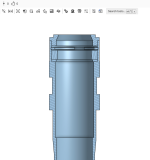
Separated the telescope from the lower leg with the help of a rubber mallet. No broken seals, just a few brittle ones. Perhaps I'll get lucky and find replacements.
The quality and metal work on the parts is impressive, this must've been an expensive fork.

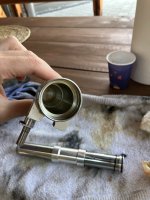
One can see the what I guess are open bath orifice damping ports, maybe there are shims inside without a piston as I see no rod? Maybe spring preloaded? Or just orifice...
Not sure how tech-forward Rond were at the time, some moto forks of the time were already using shimmed pistons. Such a cool find!

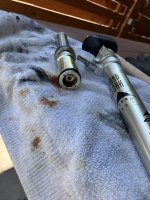
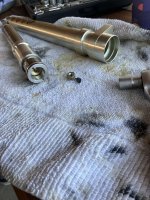
There is a screw on the bottom of the telescope which I am thinking holds the whole assembly together(holding the top cap firm) but after release and a few taps, nothing budges... BTW the top cap adjustment knob was stuck from the very beginning, it does not turn.
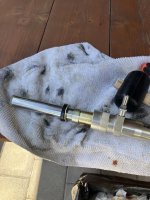
So now I am doing some more digging on the fork specs, hopefully I can get it apart without breaking something. For now, I will try more some more "persuasion" on the bottom bolt&nut and I am in no hurry.

It might be that the top cap is removable unrelated to this bottom bolt... ?
I see here that the top cap is removable with the bottom nut still fastened, tho it's not the same Rond model.

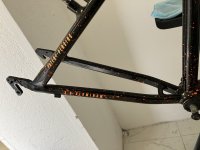
If anyone is familiar with these Rond Hydro Pro 1 forks, some tips on getting them apart is more than welcome :)
 

Attachments

  • 2.jpg
    2.jpg
    214.1 KB · Views: 85
  • 3.jpg
    3.jpg
    244 KB · Views: 83
  • 4.jpg
    4.jpg
    227.2 KB · Views: 79
  • 5.jpg
    5.jpg
    204.1 KB · Views: 77
  • 6.jpg
    6.jpg
    205.7 KB · Views: 81
  • 1.jpg
    1.jpg
    243.8 KB · Views: 90
Last edited:
While I am waiting on another heatwave to pass, I started to CAD model the fork in hopes to figure out for sure the oil level it needs.

The lower leg is disassembled and modeled(with some of the seals/retainers). I still have not gotten around to disassembling the upper leg as I am not sure how - which will also be added to the CAD assembly and hopefully we'll have a knowledge base on how these forks actually work and how to service them.
 

Attachments

  • Screenshot 2025-08-12 at 18.15.20.png
    Screenshot 2025-08-12 at 18.15.20.png
    243.7 KB · Views: 74
  • Screenshot 2025-08-12 at 18.16.09.png
    Screenshot 2025-08-12 at 18.16.09.png
    329.2 KB · Views: 75
  • Screenshot 2025-08-12 at 18.17.00.png
    Screenshot 2025-08-12 at 18.17.00.png
    417.2 KB · Views: 73
Finished with frame touch ups(I used a glossy spray in a can, sprayed some in a cup and applied with a small brush). Pictures after polishing and waxing.
The paint spots really worked wonders to blend in the new paint application. Quite pleased with how the frame turned out.

I am done with the frame at this point, now I need to sort out the fork. Also, I kinda want to use some newer parts on this bike(thinking of making it 1-by as I have a really nice shimano deore 10spd groupset) because it will be my main MTB.
 

Attachments

  • 3.jpg
    3.jpg
    226.9 KB · Views: 102
  • 7.jpg
    7.jpg
    243.6 KB · Views: 104
  • 6.jpg
    6.jpg
    245.6 KB · Views: 94
  • 4.jpg
    4.jpg
    210 KB · Views: 106
  • 2.jpg
    2.jpg
    221.2 KB · Views: 103
  • 1.jpg
    1.jpg
    206 KB · Views: 105
Last edited:

JohnnyD

Well-Known Member
Finished with frame touch ups(I used a glossy spray in a can, sprayed some in a cup and applied with a small brush). Pictures after polishing and waxing.
The paint spots really worked wonders to blend in the new paint application. Quite pleased with how the frame turned out.

I am done with the frame at this point, now I need to sort out the fork. Also, I kinda want to use some newer parts on this bike(thinking of making it 1-by as I have a really nice shimano deore 10spd groupset) because it will be my main MTB.
Fantastic touchup job.
 
Polished the cranks and some bits of the derailleur, could've turned out better but for a newbie - I'll take it! Gotta have a reason to pull them apart again.

1.jpg2.jpg

Also added a DIY chain protector to the frame as the worst wear was there. I doubt the LX derailleur has a modern clutch anti-slap feature :). It also lets me recycle part of an old tube I use to make patches with which is a win. These are also the quietest I've driven due to the foam.

I first add a self-adhesive(light adhesive) 2.5mm foam and than wrap it with an inner tube strip with electircal tape at the ends(I also add a ziptie on both ends). I forgot to take a picture of the end result but will provide one soon.

A few layers of electrical tape were also added on the seatstay's underside near the chain, where there was some paint chips previously.

3.jpg4.jpg5.jpg

p.s. Waiting on a new fork to arrive, as all the Rond stanchions' seals were too brittle and I broke a few just taking it apart. Took me a while and lots of browsing and calls to come to the realization that I cannot source replacements. The inner diameter of the headtube is quite small so only threaded steerers are an option which left me with few options. TBC
 
Last edited:
As promised, the chain protector end result pictures. Looks bulky but the frame is properly protected and it is really quiet.
2.jpg1.jpg

The wheels are finished too - I rebult the front hub(changed the cones and ball bearings, cleaned the cups since they had very very little damage. The rear wheel spun as smooth as a wheel can, so I just removed the cassette, cleaned up and re-assembled.
Switched to new Shimano skewers because the ones that came with the bike did not match and the rear one was surprisingly heavy.`
The new tires really match the frame IMO.
3.jpg

And the score of the year just came in the mail. It should fit really nicely with the silver cockpit I have planned.
4.jpg
 
They are ST-EF28 and were sold in parallel with a set of BR-M280 v-brakes(I too was unaware any of these models even existed).

I got to inspect the v brakes in person and on a bike and the "squish" of that modulation spring lever at the top was not really pleasing to me. Once we removed them from the bike I noticed they were considerably heavy which made up my mind to pass on them. I can re-purchase them later if still available.
The brakes were not in a bad shape and could clean up nice with a polish but I did not take a photo, so here is a picture of the same model from the internet for reference.
D_NQ_NP_849400-MLA54667120650_032023-O.webp


They do have a sort of a cool factor but I ultimately decided to go with a more slick pair of black Tektro vbrakes I have laying around. I already have a lot of chrome/silvery bits planned for this build and I do not want to overdo it. If I change my mind chances are these will still be available. They were also surprisingly big and imposing.
 
Last edited:

JohnnyD

Well-Known Member
And the score of the year just came in the mail. It should fit really nicely with the silver cockpit I have planned.
View attachment 14716
Early style SIS thumb shifters and v-brake combo .. never saw those before.
I have a set of later style ST-EF65-9 speed (came in 7,8, and 9 speed) that have a more modern looking thumb shifter... don't even remember what I bought them for, now they just occupy a box of extra parts.
 
The build continues(after being delayed for a while, because reasons).

Richey cockpit and forged seatpost, RST fork with Bontrager grips and SQLab saddle(my personal preference combo).
bike.jpg


Not the most flattering angle, but more pics to follow.

Some hickups with the fork - I ordered a RST Omega T 80 and an air spring upgrade kit but got a different(and more basic) Omega with 100mm of travel and NO damper whatsoever even tho I paid for a fork with one.
I did not manage to sort things out with the retailer to send me a damper, they wanted me to return the fork which means I would lose the customs charges(around 15%) and pay postage back which is another 20% of what the fork cost...

Luckily the air spring upgrade fit, so I am off to retrofit a damper. I ordered a MoCo damper for a Rockshox 30 Gold for dirt cheap(2$) and fitted it onto the coil cap with some oooooh let's say tampering :D the topcap expansion seal was replaced with a generic plumbing "squeeze" seal. The cap is glued on, not ideal. It will need a thicker outer o-ring seal, but that I can deal with. Now, I am looking to source a rebound piston&shaft combo. Working on it. Also reduced the travel to 80mm.
1.jpg2.jpg3.jpg4.jpg

Once I sort out the rebound issue(working on getting my hands on a used new gen Judy rebound assembly) I will likely need to 3D print a bottom seal cap and lathe down the piston seal seat a bit - I can start final assembly.
Cant wait to ride this bike.
 
Last edited:
Today I set up the mechanicals and did a test ride(I just couldn't wait anymore TBH). Seemed appropriate, given the sunshine.

Rides nice enough but I will likely be flipping the stem on the "raiser" side, and upsweep-rotate the handlebars. The high BB feels quirky given the low stack but I will try and avoid increasing the fork travel.
The fork still has no damper, working on that. The decals worked out nice, even though by accident.
Cheap plastic pedals with pins because I spent a lot on the cockpit.

The front derailleur has a bit of a catch-22 - the chain rubs on the bottom guide rail in second and third gear(first is OK - but only under tension) and if I drop it even a mm it will interfere with the biggest chainring when shifting to 3rd.
This is likely due to the seattube angle being too steep for the derailleur spec as it has no adjustment for rotation, I guess.
1.jpg2.jpg3.jpg4.jpg

I will do a proper photoshoot once I add the final touches and do a proper first ride. These pictures do not do it justice.
 
Last edited:

black lightning 1987

Moderator
Staff member
Is the derailleur only an issue when in the small chainring? If so I would think you could shift to the middle ring before you get to the smaller cassette cogs.
 
Is the derailleur only an issue when in the small chainring? If so I would think you could shift to the middle ring before you get to the smaller cassette cogs.
I usually use the first three cassette gears with the smallest chainring - but on this beauty I can only run the first gear without the chain rubbing on the bottom of the front chain guide.
There is no rub(for second and third cassette gear) when I use the middle chainring but the gear ratio is higher.

Not a deal breaker in any way, and I think I can tamper with the derailleur chain guide a bit to sort this out - but all in due time. Fitting a damper is first on the list.
 
Flipped the stem and it made all the difference.
10.jpg
5.jpg
1.jpg
2.jpg
4.jpg

11.jpg


The fork is a pogo stick atm but all that will be fixed. Really glad I was able to source an air fork with proper bushings instead of those plastic sleeves that are commonly found for low end forks. Once I fit a damper I'll take it for the first proper trail ride.


I finally managed to source a second-hand rebound shaft with those plastic bottom plug-and-retainer-cap design as the RST stanchions ends are bent like for these. It's from a 32mm, so I will likely need to lathe down the pison head but I think I can manage that. A bigger issue would be the if the bottom plug does not fit...
12.jpg
 

Attachments

  • 3.jpg
    3.jpg
    247.2 KB · Views: 33
Last edited:
Top